CityPay Elements
CityPay Elements is a secure, embeddable set of web components for accepting card payments (and selected alternative payment methods) in your web application. It encapsulates card data entry into isolated, CityPay‑hosted iframes, tokenises card details client‑side, orchestrates 3‑D Secure (3DS) when required, and integrates cleanly with your backend via Payment Intents.
Elements is designed for developers building modern payment flows who want strong security guarantees without sacrificing control over the customer experience. It provides pre-built payment components and a well-defined API, while leaving layout, validation, business logic, and user experience decisions firmly in your control.
Security model: When using Elements as intended, sensitive cardholder data is collected and processed only within CityPay-controlled environments. Card details never pass through merchant servers, significantly reducing PCI DSS scope while preserving flexibility in how checkout flows are implemented.
- PCI DSS scope reduction through CityPay-hosted iframes and client-side tokenisation.
- Support for Alternative Payment Methods including Apple Pay.
- Built-in 3D Secure (3DS) with automatic frictionless and challenge flows.
- Payment Intent lifecycle with explicit states and retry support.
- Event-driven integration via structured client events (
cpe:*). - Configurable automation for common flows (for example
autoHandle3DS,autoAuthorise). - Integration surfaces ranging from modular payment elements (like
cardElement(),cardFieldsElement(), andapplePay()) to prebuilt, end-to-end checkout flows (likepaymentFlow()andverifyFlow()).
Think about an Elements integration in four decisions:
1) Create a PaymentIntentSession on your backend
Your backend always starts the browser session by returning a PaymentIntentSession from createServerIntent().
In practice, the frontend depends on:
paymentIntentIdsessionTokenopaqueKey
That session lets the SDK initialise hosted fields and call session-backed intent routes safely from the browser.
2) Choose the UI surface
- Use
cardElement()when you want full control over layout, submit buttons, validation messages, and orchestration of the card payment flow. - Use
cardFieldsElement()when you want to mount individual card fields into your own form layout. - Use
applePay()to integrate a secure Apple Pay button into your custom checkout. - Use
paymentFlow()orverifyFlow()when you want a built-in action button, hosted result states, and a faster path to a working checkout.
3) Choose the transport model
- Direct: omit
middleware.attachandmiddleware.confirm, and the SDK falls back to session-backed CityPay intent endpoints. - Middleware: provide relative backend routes such as
middleware.attach,middleware.confirm,middleware.authorise, andmiddleware.verifyAuthwhen you want more control, logging, and policy enforcement.
For most teams, the practical split is:
- start with Direct to understand the flow quickly
- move to Middleware when you need stronger observability, custom orchestration, or stricter production controls
4) Follow the standard card flow
For the lower-level card form flow, the SDK’s integration path is:
init()awaitReady()tokenise()attach()confirm()handle3DSAuthentication()only when you turn offautoHandle3DSauthoriseViaBackend()orconfirm({ autoAuthorise: true, authorise: { endpoint } })
That sequence is the backbone for the rest of this guide.
This guide shows the fastest way to accept a card payment using CityPay Elements with @citypay/sdk.
If you want a prebuilt checkout UI on top of Elements, see the Flows section later in this guide.
By the end, you will have:
- created a Payment Intent
- mounted a hosted card form
- tokenised card details in the browser
- attached the token to the intent
- confirmed the intent (handling 3DS when required)
- authorised (and optionally captured) the payment from your backend
Prerequisites
Before you begin, ensure you have:
- a CityPay account
- a Client Licence Key for server-to-server requests (backend only)
- a Public Key for browser initialisation (safe to embed)
- a backend capable of:
- creating Payment Intents
- performing authorise (and capture if applicable)
- a working HTTPS environment (local dev is fine)
Security: Never expose your Client Licence Key in browser code. The Public Key is safe to embed and must be paired with a Session Token generated for the Payment Intent.
1) Create a Payment Intent (backend)
Create the Payment Intent on your backend. This declaratively represents your intent to take payment and can support multiple attempts over time. The first example uses @citypay/sdk. The other examples use the CityPay API SDKs.
Create Payment Intent
import { CityPay } from "@citypay/sdk";

const citypay = new CityPay("YourClientID", "YourLicenceKey", {
  sandbox: true,
});

const intent = await citypay.paymentIntents.create(
  {
    merchantid: 1000023000,
    amount: 1999,
    currency: "GBP",
    identifier: `order_${crypto.randomUUID()}`,
    billTo: {
      title: "Mr",
      firstname: "N",
      lastname: "Person",
      email: "n.person@example.com",
      address1: "123 Example Street",
      address2: "Example City",
      address3: "Example County",
      country: "GB",
      postcode: "JE3 3QA",
    },
  }
);

return { paymentIntentId: intent.paymentIntentId };
2) Initialise Elements and mount the card form (frontend)
Install via npm or load via a script tag. This example assumes a module install. This step creates the Elements controller and mounts the hosted card iframe; it does not itself create or charge the payment.
import { CityPayPromise } from "@citypay/sdk";

const citypay = await CityPayPromise();
const elements = await citypay.elements({
  pubKey: "XXZZYY...",
  createServerIntent: async () => {
    const res = await fetch("/api/payments/intent-session", { method: "POST" });
    return await res.json();
  },
});

const card = elements.cardElement({
  identifier: "default",
  element: "#card-form",
  layout: "stack",
});

await card.init();
await card.awaitReady();
awaitReady() is about iframe readiness and the secure handshake. It does not mean the customer has completed the form yet.
Your createServerIntent() function should return a PaymentIntentSession. In practice this includes:
paymentIntentIdsessionTokenopaqueKey
{
  "paymentIntentId": "pi_...",
  "sessionToken": "...",
  "opaqueKey": "..."
}
3) Tokenise the card details (frontend)
In a typical integration, use onChange to track when the form is complete and call tokenise() from your submit handler.
card.onChange((state) => {
  setCanSubmit(state.complete);
});
const tokeniseResponse = await card.tokenise();
const token = tokeniseResponse.data.cp_card_token;
4) Attach the token to the Payment Intent (frontend)
await card.attach({
  intentId,
  token,
});
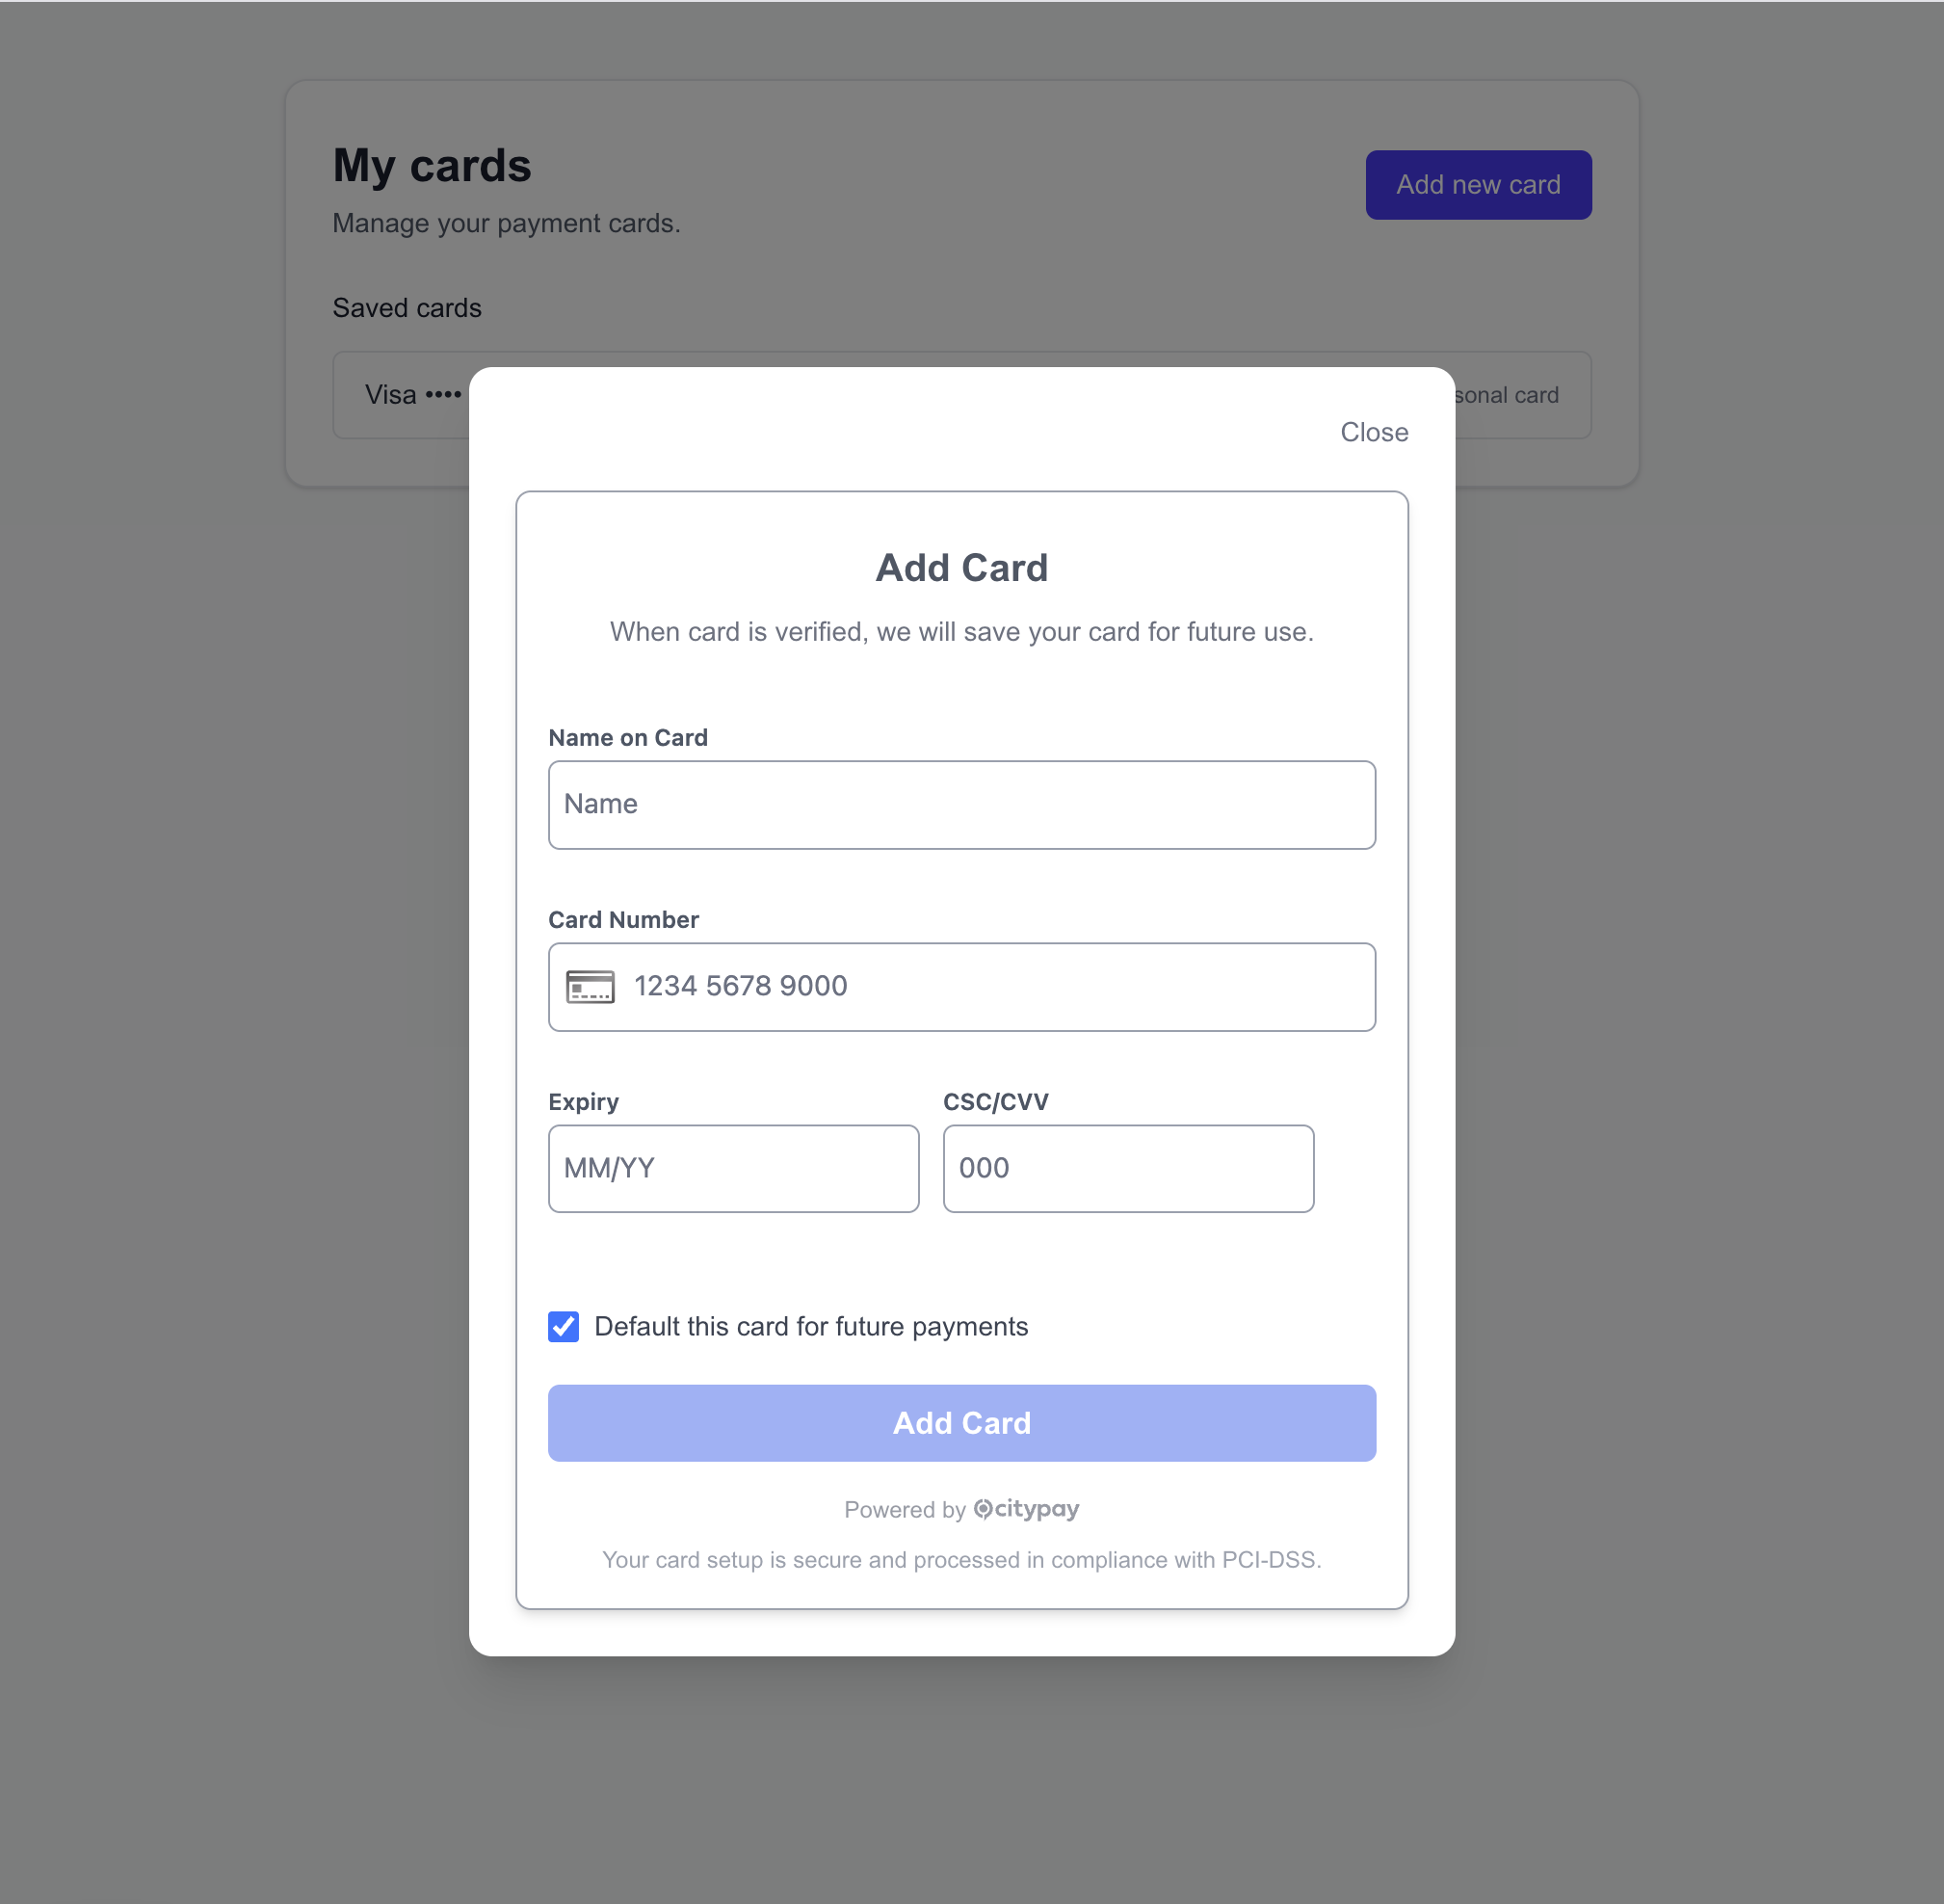
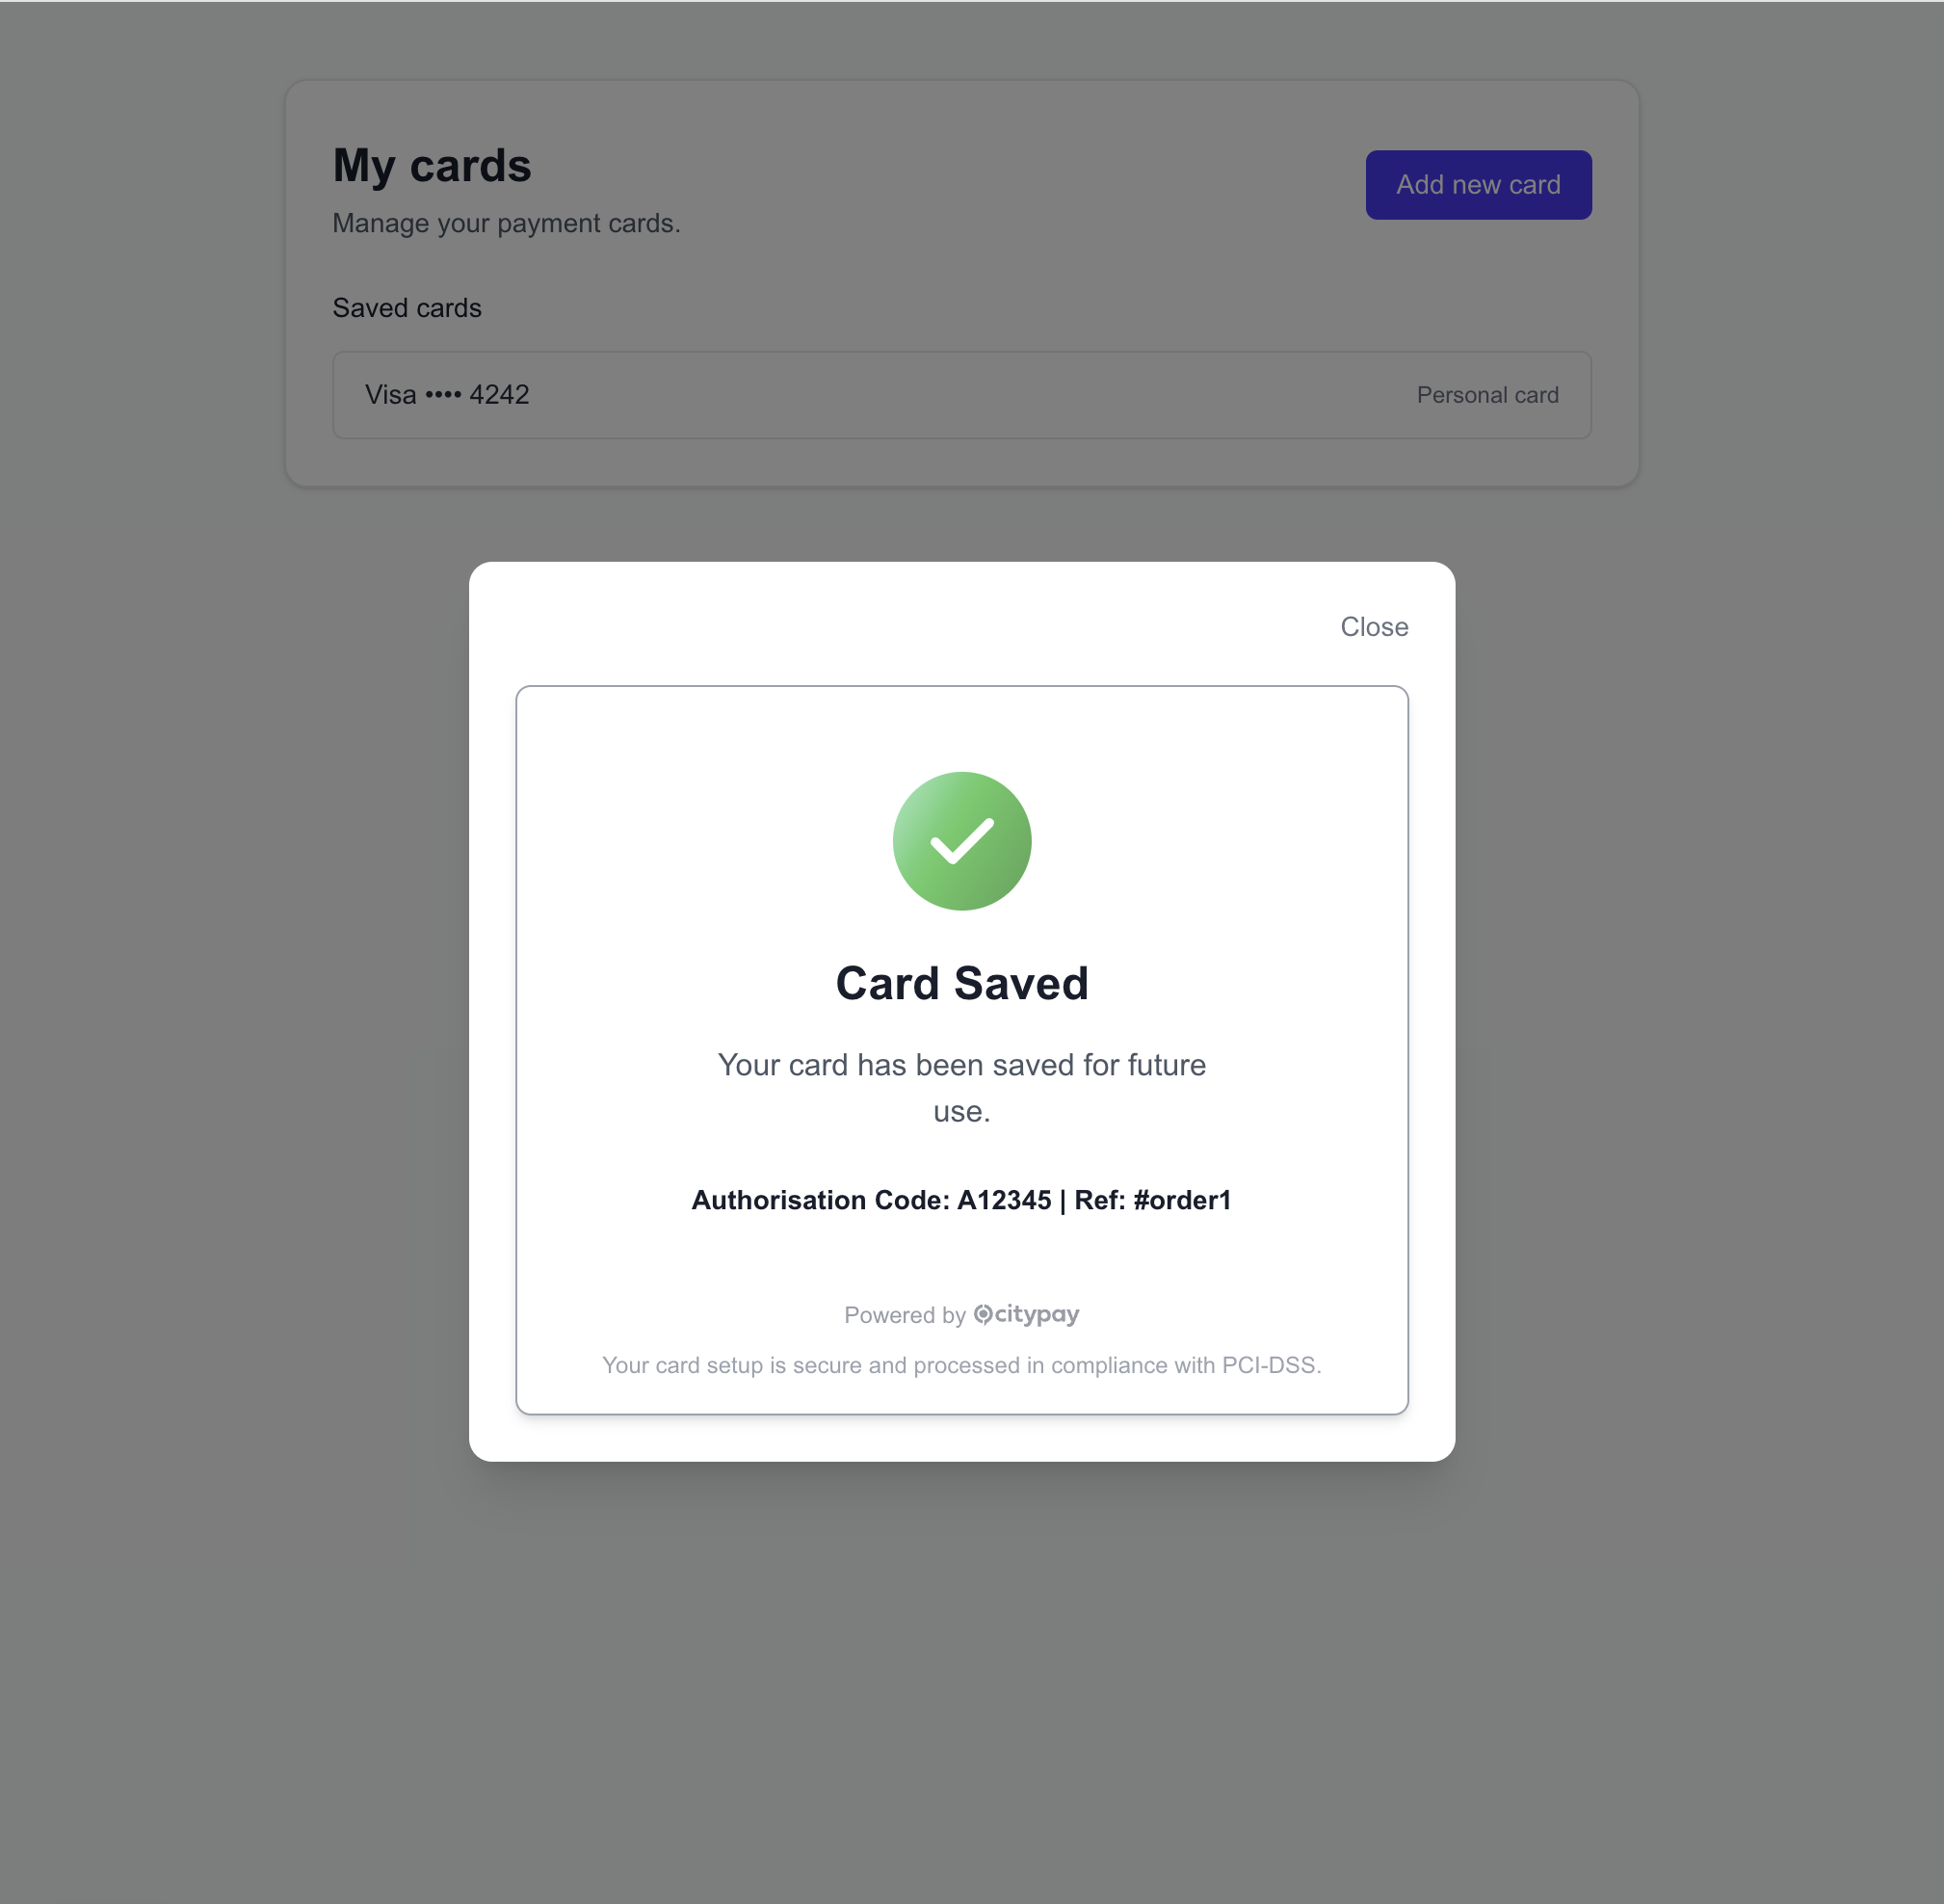
For card storage, saved cards, or card holder account updates, see Elements Card Storage.
If the attach response is requires_payment_method, do not call confirm() for that attempt. Prompt for another payment method or retry only when the returned error indicates the failure is retriable.
5) Confirm the intent and handle 3DS if required (frontend)
const confirmResponse = await card.confirm({
  intentId,
});
If authentication is required, Elements will automatically present the 3DS challenge and continue once complete.
6) Authorise (and capture if applicable) (backend)
Authorisation and capture are always performed server-side using your Client Licence Key. The first example uses @citypay/sdk. The other examples use the CityPay API SDKs.
Authorise Payment Intent
import { CityPay } from "@citypay/sdk";

const citypay = new CityPay("YourClientID", "YourLicenceKey", {
  sandbox: true,
});

const auth = await citypay.paymentIntents.authorise({
  payment_intent_id: intentId,
});

// If you use delayed/manual capture, perform capture as a separate backend call.
return auth;
7) Verify authorisation (backend)
After the payment has been authorised, your backend should verify the final state of the Payment Intent before completing the order. The first example uses @citypay/sdk. The other examples use the CityPay API SDKs.
Verify Authorisation
import { CityPay } from "@citypay/sdk";

const cityPay = new CityPay("YourClientID", "YourLicenceKey", {
   sandbox: "true",
});

const verified = await cityPay.paymentIntents.verifyAuthorised({
    payment_intent_id: intentId,
    unmask_fields: [],
});

return verified;
8) Listen for events and update your UI (frontend)
Wire up events to drive spinners, error messages, and success states.
card.on("cpe:ready", () => {
  // enable pay button if form is complete
});

card.on("cpe:processing:start", () => {
  // show spinner, disable submit
});

card.on("cpe:processing:end", () => {
  // hide spinner, re-enable submit if needed
});

card.on("cpe:error", (e) => {
  // show a user-friendly error message
  // never log tokens or 3DS artefacts
});
Expected lifecycle (typical)
A typical successful flow will transition through states such as:
openrequires_payment_methodrequires_customer_confirmationrequires_customer_authentication(only if 3DS is required)requires_authorisation
After backend authorisation, your server-side payment flow may then progress to outcomes such as succeeded, failed, cancelled, or requires_capture where capture is deferred.
Next steps
- Review Payment Intent lifecycle & states in the Definitions section.
- Implement the minimum recommended security controls (CSP, frame-ancestors, logging hygiene) before production go-live.
With a few lines of code you’ll:
- Mount a ready‑to‑use card form (or individual hosted fields).
- Tokenise the card details in the browser.
- Attach the token to a Payment Intent.
- Confirm the intent and let Elements handle 3DS if needed.
- Authorise via your backend, then capture or auto-capture funds per your settlement policy..
- Verify the authorisation, and progress your checkout
- Developers & integrators building bespoke checkout flows in modern frameworks (React, Next.js, Vue, plain JS).
- Solution architects who want predictable payment state machines and clean separation of duties between browser and server.
- Security & compliance teams seeking a clearly scoped integration that aligns with PCI DSS v4 expectations.
- On page: You embed a CityPay card form or hosted fields. The sensitive inputs live inside CityPay-hosted iframes. The browser never sees raw PAN data outside those frames.
- In browser (with optional middleware):
- The SDK is initialised with a Public Key and a backend-provided
createServerIntent()function that returns aPaymentIntentSession. - By default, the SDK can call CityPay directly for methods such as
attach()andconfirm(). - You may instead configure middleware endpoints (relative URLs). In this mode, the SDK calls your backend first, and your backend forwards those requests to CityPay using your API Key.
- Middleware can be applied selectively: you might handle only
attach()through your backend, while lettingconfirm()go direct, or vice-versa. - Your backend:
- Always creates and tracks Payment Intents.
- Always performs the authorise step and decides when to capture or auto-capture funds.
- Always performs the verify step to confirm the payment has been captured.
- May also handle attach and confirm if you’ve configured middleware, giving you observability, logging, and compliance control.
- CityPay services: Handle 3-D Secure orchestration (frictionless or challenge), intent state transitions, and authorisation routing. Whether called directly or via middleware, the same secure APIs are invoked under the hood.
- Hosted card fields (ready‑made card form or composable inputs)
- Payment with ApplePay
- Tokenisation & device fingerprinting
- 3DS flows (frictionless + challenge)
- Explicit intent states & idempotent flows
- Event model for telemetry, UX, and retries
- Optional auto‑flows (
autoHandle3DS,autoAuthorise) - Support for MOTO (Mail Order / Telephone Order) where 3DS is not applicable
- Foundation for vaulting (token reuse, subject to merchant configuration)
- Payment Intent – a stateful payment object that moves through creation, confirmation, (optional) customer authentication, authorisation and capture.
- Token – a single‑use surrogate for card details, created by Elements in the browser.
- Confirm – the action that requests any required customer authentication (3DS).
- Authorise – the server‑side step that reserves funds.
- Capture – the server‑side step that transfers funds (immediate or deferred).
- Verify - the server-side step that verifies the entire payment flow has completed with an authorised fund transfer
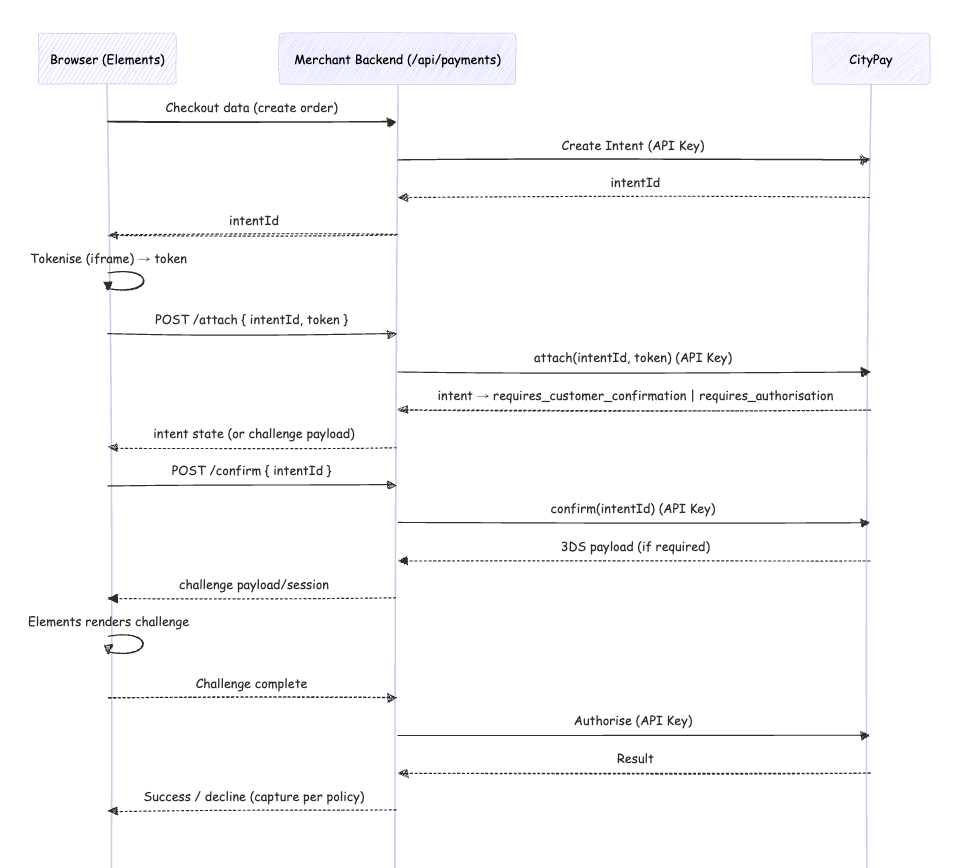
| Mode | Pros | Cons | Best for |
|---|---|---|---|
| Middleware (SDK posts to your backend, API Key forwards to CityPay) | • Centralised logging, retries, observability • Full control over attach/confirm routing • Easier to extend with custom orchestration | • Requires backend endpoints (e.g. /attach, /confirm)• Slightly more development effort initially | Production-grade builds, larger teams, strict compliance environments |
| Direct (SDK calls CityPay directly for attach/confirm) | • Fastest integration path • Fewer backend endpoints to implement • Ideal for demos, pilots, or rapid prototyping | • Limited backend visibility and control for client-side steps • Harder to enforce custom policies or logging | Small teams, proof-of-concept builds, rapid go-live scenarios |
| Step | Middleware (API Key on backend) | Direct |
|---|---|---|
| Initialise | await citypay.elements({ pubKey, createServerIntent, middleware: { attach, confirm, authorise } }) | await citypay.elements({ pubKey, createServerIntent }) |
| Create Intent | Backend creates intent with API Key → returns intentId to browser. (Optionally: accept token + create intent in one middleware call.) | Backend creates intent (same as Middleware). |
| Tokenise | Browser (Elements iframe) → returns token (PAN never hits merchant). | Browser (Elements iframe) → returns token (same). |
| Attach | Browser → Merchant: POST /api/payments/attach → Backend → CityPay with API Key. | Browser → CityPay: attach({ intentId, token }). |
| Confirm | Browser → Merchant: POST /api/payments/confirm → Backend → CityPay with API Key. Backend returns 3DS payload/session to browser. | Browser → CityPay: confirm({ intentId, autoHandle3DS? }). |
| 3DS UI | SDK renders challenge in the browser using payload returned by backend (if needed). | SDK renders challenge in the browser automatically (if needed). |
| Authorise | Backend → CityPay with API Key (always backend). | Backend → CityPay with API Key (always backend). |
| Capture | Backend immediate or delayed per policy. | Backend immediate or delayed per policy. |
| Idempotency | SDK generates a per-flow key; backend should forward it as X-Idempotency-Key on every backend→CityPay call. | SDK generates a per-flow key; CityPay honours it on confirm. Backend must reuse it for authorise. |
| Credentials used | Browser: none (only hits your /api paths)Backend: API Key (create, attach, confirm, authorise, capture) | Browser: Public Key + session-backed Elements requests Backend: API Key (create, authorise, capture) |
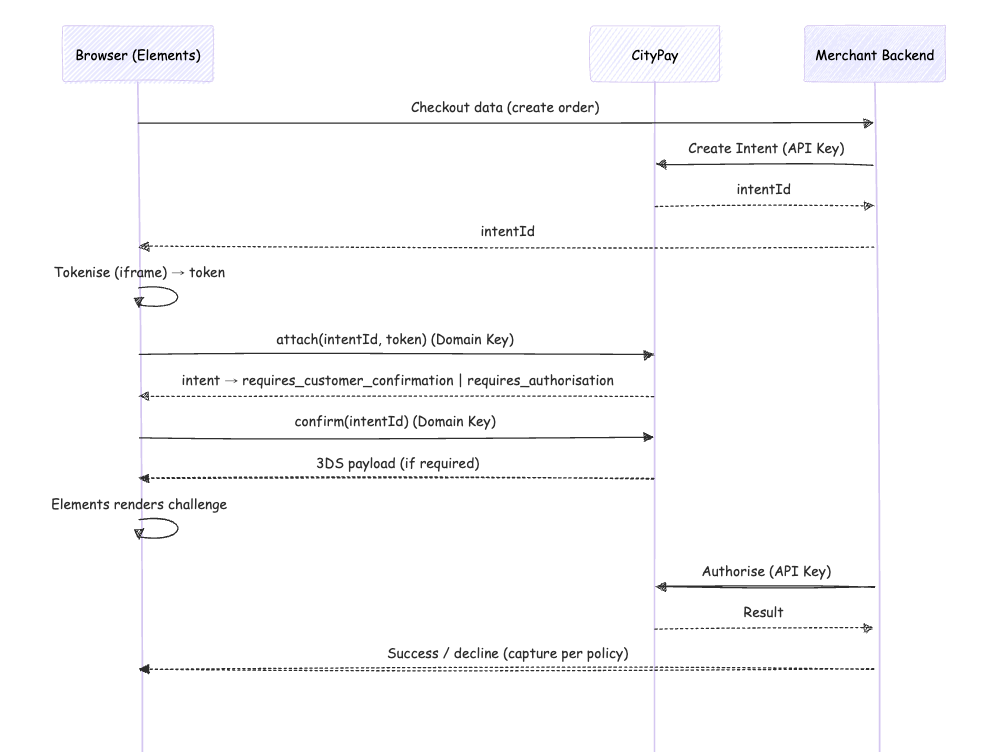
| Network paths | Browser ↔ Merchant (all) • Merchant ↔ CityPay (all) | Browser ↔ CityPay (attach/confirm) • Browser ↔ Merchant (checkout data) • Merchant ↔ CityPay (create/authorise/capture) |
| When to choose | Maximum control, observability, retries, and compliance. Best for production-grade builds. | Fastest go-live; minimal backend work. Good for pilots, POCs, or rapid timelines. |
Direct Mode
- Browser calls CityPay directly for client-side Elements operations such as
attach()andconfirm(). - Fastest to implement, but gives you less backend visibility into those client-side steps.
- Authorise is always backend-only using the API Key.
Middleware Mode
- Browser calls your backend endpoints (e.g.
/api/payments/attach). - Backend forwards the request to CityPay using the API Key.
- Preferred for production: centralised control, observability, and easier retries.
- Authorise is always backend-only with the API Key.
stack
Fields are stacked vertically, but related fields (e.g., Expiry + CSC) may appear inline within the stack. Best for narrow/mobile views.
row-minimal
All fields appear in a single horizontal row, with placeholders acting as labels. Very compact; ideal for inline flows where space is limited. Accessibility requires aria-labels or sr-only labels.
row-compact
Similar to row-minimal, but includes small visible labels above inputs while retaining the horizontal arrangement. Balances clarity with compactness.

row
Default horizontal row layout. Fields are arranged side-by-side with full visible labels and consistent spacing. Best for wide containers where horizontal space is available.

column-compact
Fields are stacked vertically with reduced spacing, or small labels. A hybrid between full column and compact mobile layouts.
column
Full vertical layout, each field occupying the full width in its own row with visible labels. The most traditional and accessible form layout.
Elements API Reference
attach, confirm, and authorise
through your middleware, or fall back to session-backed CityPay intent endpoints when middleware is omitted./api paths; your backend → CityPay with API Key) modes; only the network path differs.AttachOptions:{ intentId?: string; token?: string; storeCard?: boolean }ConfirmOptions:{ intentId?: string; autoHandle3DS?: boolean; autoAuthorise?: boolean; idempotencyKey?: string; authorise?: { endpoint: string; payload?: any } }ChallengePayload: 3DS challenge payload returned by your backend or CityPay.AttachResponse,ConfirmResponse,AuthoriseResponse: JSON responses reflecting intent state and challenge metadata.AuthOptions:{ intentId?: string; endpoint: string; headers?: Record<string, string>; timeoutMs?: number; payload?: any; idempotencyKey?: string; verify?: boolean }
Idempotency Always propagate the SDK’s idempotencyKey to backend → CityPay calls. It ensures safe retries and
consistent state transitions.
TypeScript
import { initCityPayElements } from '@citypay/elements'

const elements = initCityPayElements({
  pubKey: 'your-public-key-here',
  createServerIntent: async () => {
    const response = await fetch('/api/create-payment-intent', { method: 'POST' });
    return await response.json();
  }
})

const api = elements.cardElement({
  element: '#card-form',
  language: 'en',
  layout: 'stack',
  theme: 'auto',
  width: '100%',
  height: 220,
})

await api.init()
await api.awaitReady()
Apple Pay is a supported payment method within CityPay Elements. It allows customers to pay using their Apple Pay wallet, providing a fast and secure checkout experience.
What Apple Pay with Elements provides
- Reduced boilerplate code through automatic management of the Apple Pay session.
- Unified event interface with no need for new event handlers just for Apple Pay.
- Payment intent integration for consistent lifecycle management.
Additional Prerequisites
In addition to the general prerequisites, ensure you have:
- your domain registered with Apple.
- familiarity with the payment flow for card payments.
- an Apple browser (e.g. Safari).
Quick Start Apple Pay with Elements
- Acquire a Payment Intent (backend)
If you have already implemented another payment method, then the same Payment Intent should be passed to ApplePay.
- Initialise Elements and mount ApplePay
CityPay Elements is initialised once, and then this single instance is used to create all payment methods, including Apple Pay. See Initialising CityPay Elements for how to initialise CityPay Elements.
An Apple Pay Element is created either by directly calling the CityPay SDK, or by creating an instance of the appropriate component for your framework:
Initialise Apple Pay
const opts = {
  identifier: 'applepay',
  element: applepayHostDiv,
  total: { amount: 1, label: 'GBP' },
}

const api = citypayElements.applePay(opts)
await api.init()
await api.awaitReady()
If you are in a browser that supports Apple Pay, the Apple Pay button should be rendered.
- Listen for authorisation complete
Once a user clicks the Apple Pay button, Apple Pay begins its own Apple Pay session. Elements automatically manages this session to collect and process the user's payment information. The tokenise, attach, confirm and authorise steps of the payment are therefore automatic when using Apple Pay. When the Apple Pay session ends, the user will have made an authorised payment, collected by CityPay and ready for settlement.
When this happens, Elements will trigger the onAuthoriseStart and onAuthoriseEnd events to inform your page of the transaction progress and result:
applepay.onAuthoriseStart(() => {
  // Payment authorisation started
})

applepay.onAuthoriseEnd((event) => {
  if (event.success) {
    // Payment was authorised successfully
    // Inform backend processing or redirect user
  } else {
    // Payment failed or was declined
    // Update UI to allow retry
  }
})
or in a component, this will be implemented as a property:
<ApplePayElement
  options={{ total: { amount: 100, label: 'Merchant Name' } }}
  onAuthoriseStart={() => {
    // Authorisation started logic
  }}
  onAuthoriseEnd={(event) => {
    if (event.success) {
      // Success logic
    }
  }}
/>
- Confirm payment (backend)
The Apple Pay session allows Elements to collect the user's payment securely. However, the onAuthoriseEnd event fired by Elements is generated and consumed client-side. This makes it vulnerable to malicious users attempting to spoof a successful payment.
Do not treat client-side Apple Pay completion events as proof of payment. Use them only to update UI state. Your backend must verify the final authorised state of the Payment Intent, including amount and currency, before accepting the order.
const result = await citypay.paymentIntents.verifyAuthorised({
        payment_intent_id: intentId,
        unmask_fields: []
    })
if (result.status === 'success') {
  // Finalise order
}
Apple Pay Visual Customisation
Apple Pay allows limited customisation of the rendered Apple Pay button, which is reflected in Apple Pay with Elements.
Further customisation of the Apple Pay button is prohibited by Apple's Human Interface Guidelines
The style and content of the Apple Pay button are specified when creating the Apple Pay element. See the API Method
Retrieving User Information
Apple Pay stores a user's contact details in order to authorise payment. If you need to collect these details within your payment flow, this can be done as part of the Confirm Payment step.
By default, the verifyAuthorised function, if successful, returns the authorisation details of the authorised payment. These
include the users contact details. However, as personally identifiable information, these are redacted by default.
To retrieve them, modify your call to verifyAuthorised to request one or more fields are sent without redaction:
const result = await citypay.paymentIntents.verifyAuthorised({
        payment_intent_id: intentId,
        unmask_fields: ['name', 'email', 'address', 'postcode']
    })
if (result.status === 'success') {
  const name = result.auth.name
  const email = result.auth.email
  // ...
}
elements.applePay(options: AltPaymentOptions): ElementsApi
This creates and mounts a hosted Apple Pay button, returns an ElementsApi with lifecycle methods, and prepares the Apple Pay flow for capability checks, user authorisation, and callback handling.
Purpose
Mount an Apple Pay button on your page, ready to:
- Check whether the current device/browser can make Apple Pay payments.
- Render an Elements-managed Apple Pay entry point.
- Start the Apple Pay payment flow for your payment intent.
- Return success, failure, or cancellation events to your application.
- Coordinate with your backend for payment authorisation and follow-up actions.
Flow
- Initialise: Create the Apple Pay instance.
- Mount: Call
init()to mount the component. - Wait: Call
awaitReady()for handshake completion. - Authorise: Handled automatically via Apple Pay button interaction.
- Callback: Handle the
onAuthoriseEndevent.
Signature
- options: Button appearance, mounting target, payment reference, and callback settings.
Throws a CityPayError if id or options are invalid.
Appearance
The Apple Pay button appearance is controlled via the appearance option:
appearance?: {
  type?: ApplePayButtonType;
  style?: ApplePayButtonStyle;
}
type selects the semantic button variant, such as buy, pay, or donate.
The available options are: ['add-money', 'book', 'buy', 'check-out', 'contribute', 'donate', 'order', 'plain', 'reload', 'rent', 'subscribe', 'support', 'tip', 'top-up']
style selects the Apple Pay button visual style.
The available options are: ['dark', 'white', 'white-outline']
For example, the option value
appearance: {
  type: 'donate';
  style: 'white';
}
renders the Apple Pay button as:

elements.cardElement(options: CardElementOptions): ElementsApi
This creates and mounts the hosted card form (all fields inside CityPay-hosted iframes), returns an ElementsApi, and wires up the current Elements transport flow.
Purpose
Mount a PCI-scoped, CityPay-hosted card UI on your page, ready to:
- Tokenise card data securely in-browser.
- Attach the token to a Payment Intent.
- Confirm the intent and handle 3-D Secure (3DS).
- Coordinate with your backend for authorisation and capture.
Flow
- Initialise: Create the Card Element instance.
- Mount: Call
init()to mount the component. - Wait: Call
awaitReady()for handshake completion. - Tokenise: Call
tokenise()to get a card token. - Attach: Call
attach()to link the token to the intent. - Confirm: Call
confirm()to handle 3DS and prepare authorisation. - Authorise: Finalise the payment from your backend.
Signature
- options: UI, mounting and behaviour settings.
Throws a CityPayError if the options are invalid.
elements.cardFieldsElement(options: CardFieldsElementOptions): ElementsApi
This creates and mounts modular hosted card fields (PAN, Expiry, CSC, and Name), each inside their own CityPay-hosted iframe. This allows you to style and position individual fields while maintaining full security and PCI scope reduction.
Purpose
Mount individual card fields into your own checkout layout:
- Maintain full layout control of your checkout page.
- Collect card data securely via individual field iframes.
- Apply your own styles to the field wrappers.
- Tokenise the combined card data securely.
Flow
- Initialise: Create the Card Fields instance.
- Mount: Call
init()to mount the individual field iframes. - Wait: Call
awaitReady()for handshake completion across all fields. - Tokenise: Call
tokenise()to get a card token from the combined fields. - Attach: Call
attach()to link the token to the intent. - Confirm: Call
confirm()to handle 3DS. - Authorise: Finalise the payment from your backend.
Signature
- options: Individual element targets and shared field settings.
Resolve Options
The resolveOptions object controls how the SDK finds the mount target when a CSS selector string is used:
autoDiscover?: boolean: Iftrue(andelementis omitted), the SDK attempts to find a known mount target automatically.allowCustomElement?: boolean: Iftrue(default), the SDK can mount into custom DOM elements (like<citypay-element>).within?: ParentNode: Limits the selector search to the specified parent node (defaults todocument).
elements.paymentFlow(options: FlowOptions): ElementsApi
Creates and mounts a prebuilt payment Flow. See the Flows section for details.
elements.verifyFlow(options: FlowOptions): ElementsApi
Creates and mounts a prebuilt verification Flow. See the Flows section for details.
Theme Tokens
You may override theme variables to match your design system:
Theme Tokens
type ThemeTokens = {
'--cpe-bg'?: string;
'--cpe-bg-alt'?: string;
'--cpe-fg'?: string;
'--cpe-fg-muted'?: string;
'--cpe-border'?: string;
'--cpe-border-subtle'?: string;
'--cpe-focus'?: string;
'--cpe-error'?: string;
'--cpe-success'?: string;
'--cpe-accent'?: string;
'--cpe-input-bg'?: string;
'--cpe-input-fg'?: string;
'--cpe-input-border'?: string;
'--cpe-input-placeholder'?: string;
'--cpe-radius'?: string | number;
'--cpe-gap'?: string | number;
'--cpe-padding'?: string | number;
'--cpe-control-height'?: string | number;
'--cpe-font'?: string;
}
Return: ElementsApi (for this form)
After cardElement(...), you’ll typically:
Initialisation
    await api.init();
    await api.awaitReady(); // handshake complete
    const token = await api.tokenise();
Lifecycle & Events
When you call init() the component:
- Resolves and validates the mount container.
- Builds the iframe URL based on language and layout.
- Mounts the iframe with a fresh session uuid.
- Establishes a secure MessageChannel handshake.
Key events to wire up:
cpe:ready— fired once the handshake completes (pair with awaitReady()).cpe:change— field state updates.cpe:processing:start/cpe:processing:end— show/hide spinners.cpe:error— operation-scoped failure details.
Example
    api
        .onReady(() => setReady(true))
        .onChange((s) => setPayEnabled(s.complete))
        .onProcessingStart(() => showSpinner())
        .onProcessingEnd(() => hideSpinner())
        .onError((e) => notifyUser(e.detail?.message ?? 'Payment error'));
awaitReady(): Promise<void>
Waits for the iframe’s MessageChannel handshake before interaction. It indicates the iframe is ready, not that the customer has completed the form.
Flow
init() -> awaitReady()
Use Case 1: Late Payment Surcharge
const card = elements.cardElement({ identifier: "default", ...opts });
await card.init();
await card.awaitReady(); // safe to call tokenise()
Emits: cpe:ready.
Initialisation Requirements & Best Practice
- Mount container must exist and be visible. If using React/Next, create the form after the container is rendered (e.g. in useEffect with refs).
- CSP must allow CityPay origins for script, frame, and connect. Add frame-ancestors appropriately to prevent hostile embedding.
- Sizing: If you set width/height, allow enough space for validation messaging and accessibility focus rings. The component will enforce minimums.
- Language/layout: Choose a layout that avoids input crowding on smaller viewports. Use layouts supported by the current Elements runtime, and prefer
stackwhere clarity matters more than density. - Focus & a11y: Do not trap focus around the container; Elements manages field focus within the iframe. Provide clear error regions adjacent to the container for screen readers.
- SSR: Instantiate only client-side. Wrap in guards like if (typeof window !== 'undefined').
init(): Promise<void>
Initialises the form, event channels, and hosted fields.
Flow
elements.cardElement() or elements.applePay() -> init()
Throws if the mount target or configuration is invalid.
tokenise(): Promise<TokeniseResponse>
Tokenises card details inside the iframe and returns a TokeniseResponse. Read the card token from response.data.cp_card_token.
Flow
awaitReady() -> tokenise()
Emits:
cpe:processing:start/cpe:processing:endcpe:erroron failure
Usage
const response = await card.tokenise();
const token = response.data.cp_card_token;
// send token + checkout data to backend
attach(options: AttachOptions): Promise<AttachResponse>
Associates a token with an existing Payment Intent.
Flow
tokenise() -> attach()
- Direct: SDK → CityPay.
- Proxy: SDK → Merchant backend
/attach, then backend → CityPay.
Emits: cpe:attach:start / cpe:attach:end, cpe:error.
confirm(options: ConfirmOptions): Promise<ConfirmResponse>
Confirms the intent and handles 3DS if required.
Flow
attach() -> confirm()
autoHandle3DSdefaults totrue→ the SDK renders the challenge automatically when required.- Optionally
authorise: { endpoint, ... }triggers backend authorisation after confirm when you also setautoAuthorise: true.
Emits:
cpe:confirm:start/cpe:confirm:endcpe:challenge:start/cpe:challenge:end(if 3DS)cpe:erroron failure
handle3DSAuthentication(challenge: ChallengePayload): Promise<string | undefined>
Starts a 3DS challenge from a payload returned by confirm() when you are handling 3DS manually.
Flow
confirm() (requires 3DS) -> handle3DSAuthentication()
Emits: cpe:challenge:start / cpe:challenge:end, cpe:error.
authoriseViaBackend(options: AuthOptions): Promise<AuthoriseResponse>
Helper to call your backend to perform authorise.
Flow
confirm() (success) -> authoriseViaBackend()
- Use this when you want explicit server-side control over authorisation.
options.endpointshould point at your backend route, not directly at CityPay.- Emphasise idempotency for retries.
Emits: cpe:authorise:start / cpe:authorise:end, cpe:error.
reset(): Promise<void>
Clears field state and validation, e.g., after a decline.
Flow
confirm() (failure) -> reset()
Event API
on(type, listener): this– chainable listener registration.onChange,onReady,onProcessingStart,onProcessingEnd– convenience hooks.addEventListener/removeEventListener– DOM-style APIs.
If you want a prebuilt checkout UI, use CityPay Flows. Flows wrap the hosted card iframe with a built-in action button and success or failure result states. Flows are part of Elements, not a separate payment product.
Flows still use the same backend responsibilities described above:
- Create the Payment Intent and return a
PaymentIntentSessionfrom your backend. - Keep capture, fulfilment, and any post-payment business logic server-side.
- Optionally provide
middleware.authoriseandmiddleware.verifyAuthif you want Flows authorisation and post-auth verification routed through your backend endpoints. - If
middleware.authoriseis omitted, Flows fall back to the session-backed CityPay/intent/authoriseroute.
CityPay Flows currently provide two entry points:
paymentFlow()for a payment flow.verifyFlow()for verifying a card without taking payment.
For saved-card and card holder account behaviour in Flows, see Elements Card Storage.
Card Element vs Flows
| Option | Best when | Notes |
|---|---|---|
| Card Element | You want full control over layout, submit buttons, and step-by-step orchestration. | You handle submit state, tokenise, attach, confirm, and backend authorise in your own UI. |
| Flows | You want a prebuilt payment or card-save experience with a built-in action button and result states. | Flows still use the same Payment Intent and backend responsibilities underneath. |
Examples
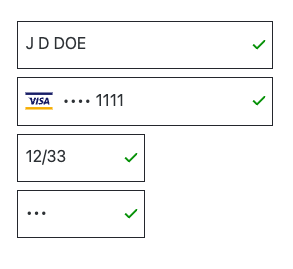
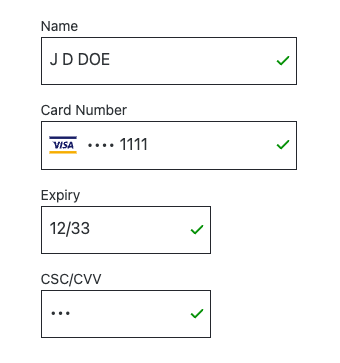
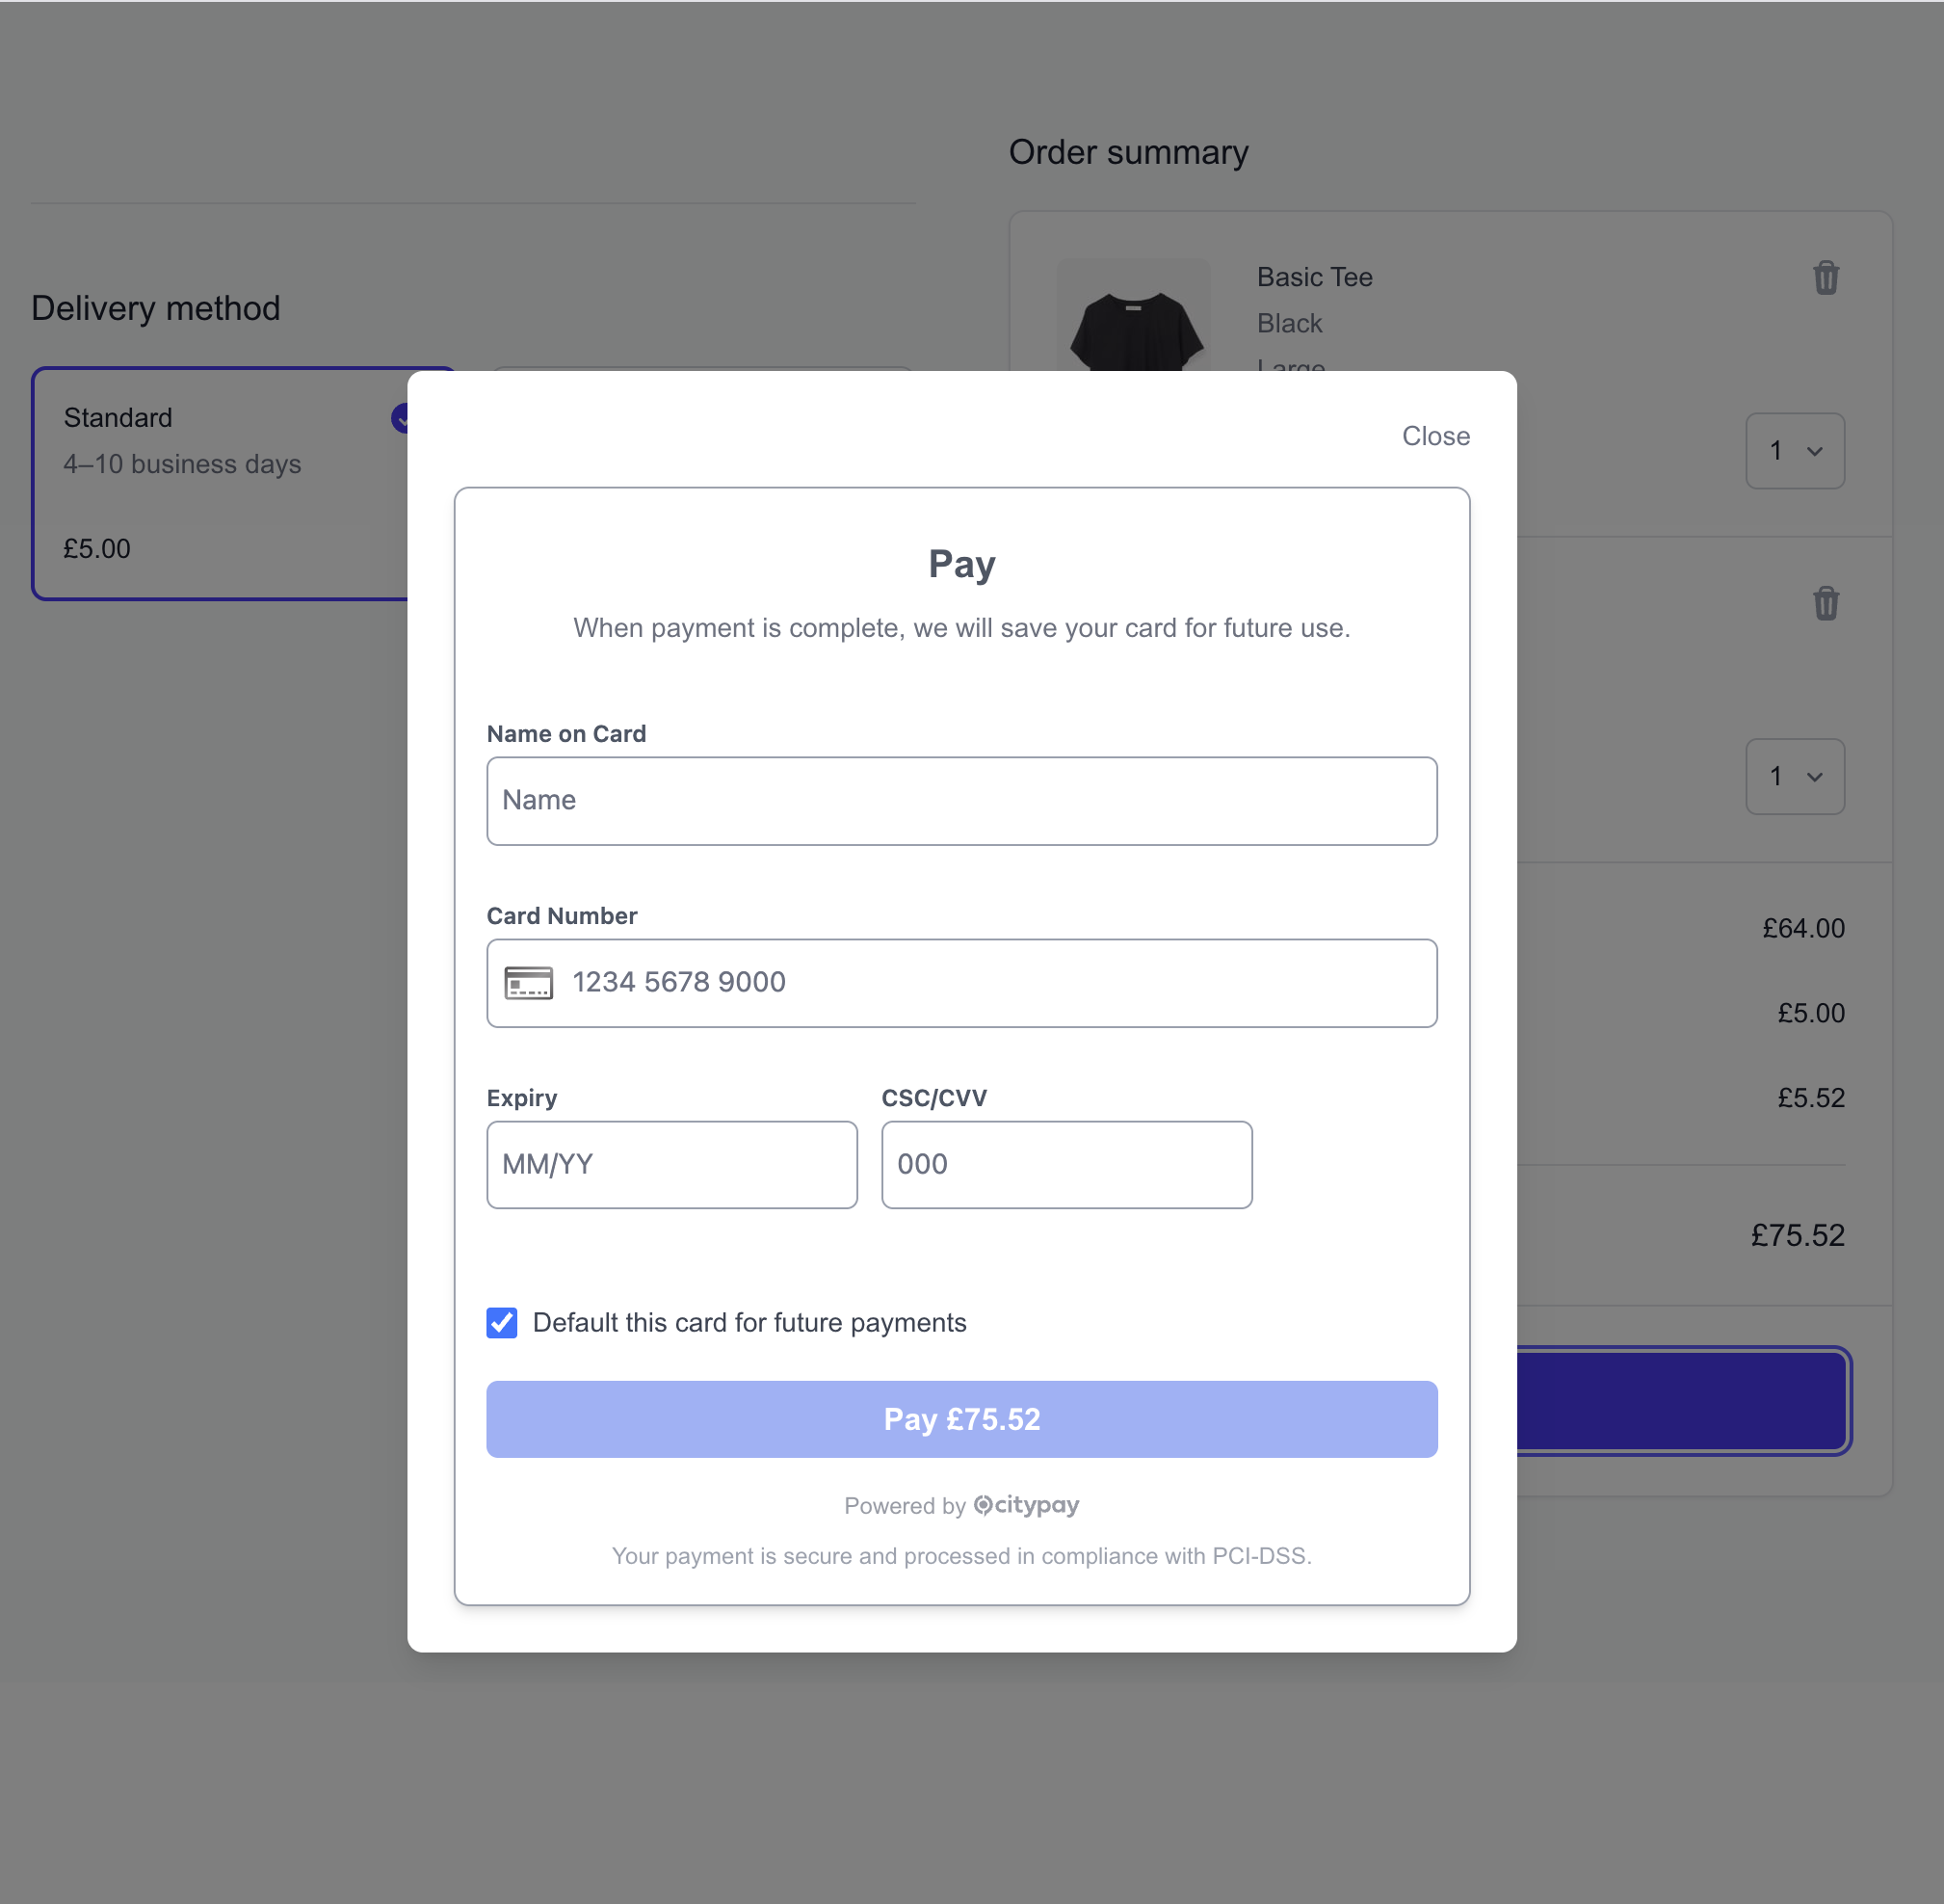
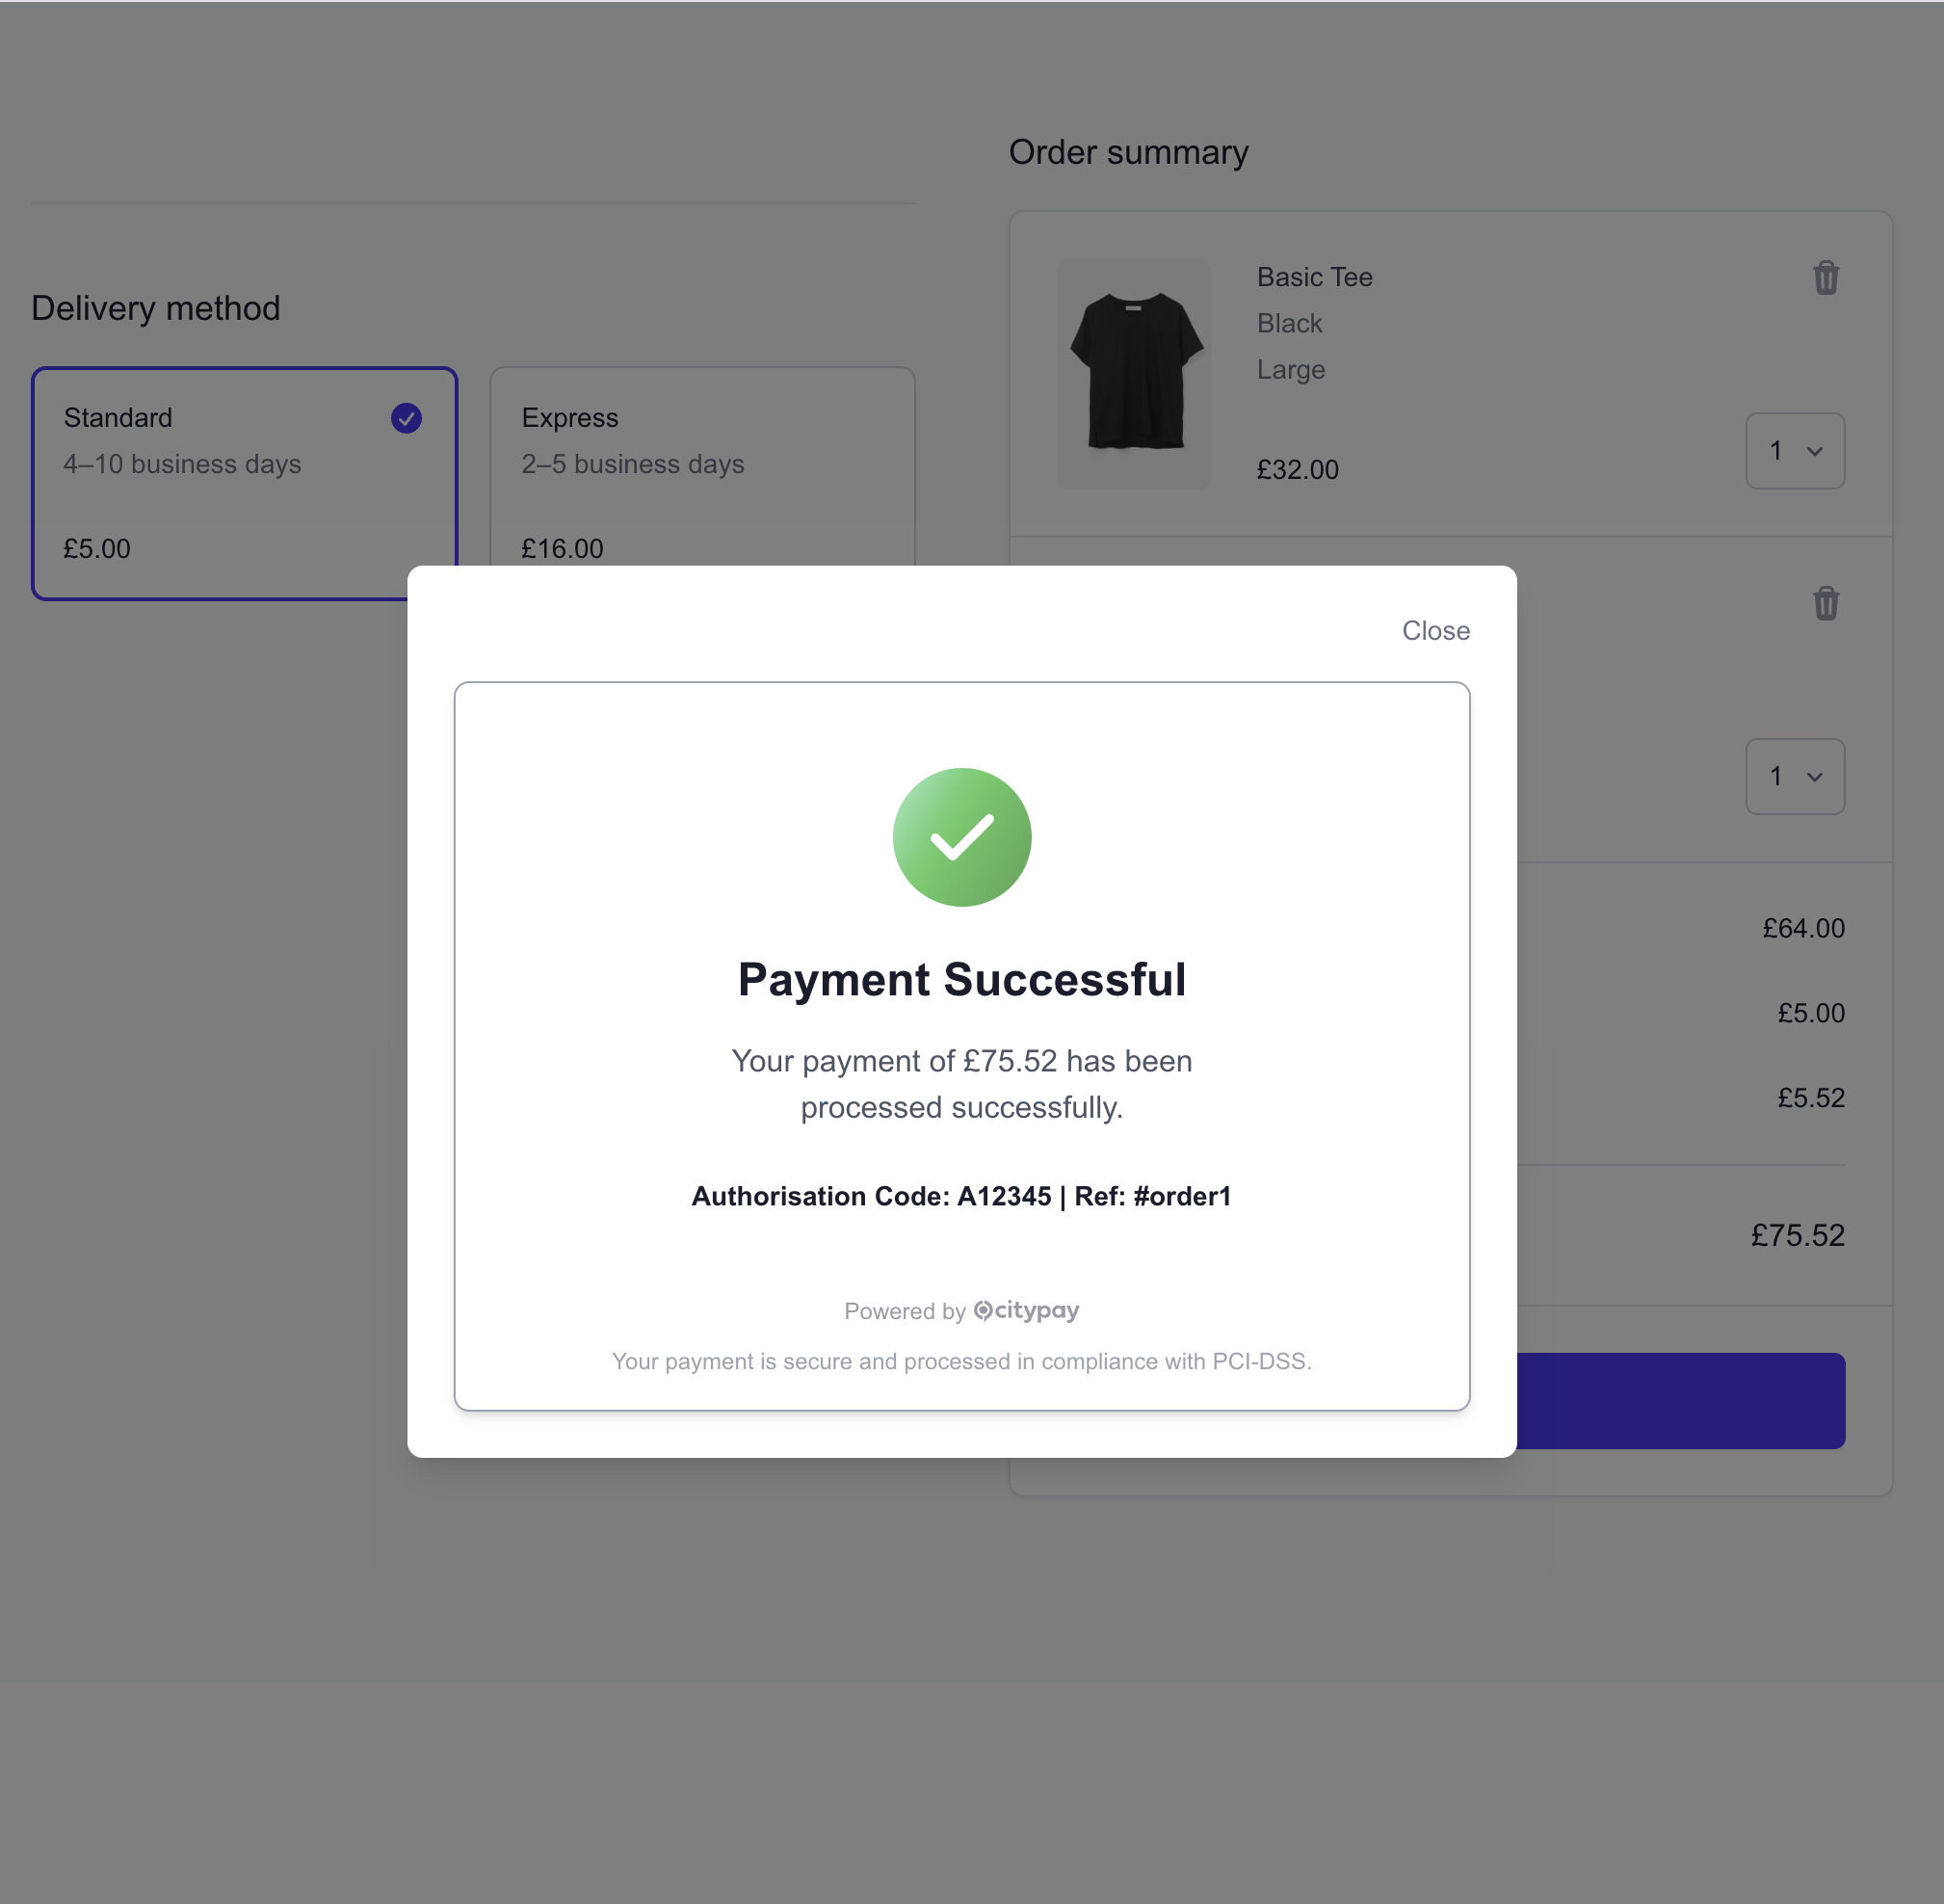
The screenshots below show the two Flows in their initial and completed states.
Payment Flow
Payment Flow Result
Verify Flow
Verify Flow Result
Lifecycle
With Flows, the built-in action button performs the browser-side flow for you and then renders its own success or failure state:
- Tokenise card details.
- Attach the payment method to the intent.
- Confirm the intent and handle 3DS if required.
- Authorise the intent using the configured
middleware.authorisepath or the session-backed intent route. - If
middleware.verifyAuthis configured, notify your backend to verify the final authorisation state. - Render a built-in success or failure state, with built-in retry on failure.
If attach fails with requires_payment_method, Flows stop before confirm and render the failure state. The built-in Try again action clears the failed card attempt, creates a fresh 3DS transaction id for the next authentication attempt, and reuses the same Payment Intent/session.
Setup
Initialise Elements as normal. You may provide an authorise middleware route if you want authorisation to go through your backend; otherwise Flows can use the session-token authorise route.
import { CityPayPromise } from "@citypay/sdk";

const citypay = await CityPayPromise();
const elements = await citypay.elements({
  pubKey: "XXZZYY...",
  createServerIntent: async () => {
    const res = await fetch("/api/payments/intent-session", { method: "POST" });
    return await res.json();
  },
});
Mount Flows
Use paymentFlow() or verifyFlow() instead of cardElement(). paymentFlow() defaults identifier to "default_payment_flow" and verifyFlow() defaults it to "default_verify_flow".
Mount Flows
const paymentFlow = elements.paymentFlow({
  element: "#flow-form",
});

await paymentFlow.init();
await paymentFlow.awaitReady();
Flows inherit the shared mounted-element options used by cardElement(), including element, language, theme, width, height, and resolveOptions.
Shared Flows options:
identifier?: stringoptionally sets a unique identifier for the mounted Flow instance. Defaults to"default_payment_flow"forpaymentFlow()and"default_verify_flow"forverifyFlow().layout?: stringoptionally selects a layout or styling variant for the hosted Flow UI.cardSchemesDisplay?: CardSchemesDisplaycontrols hosted card scheme badge rendering, the same ascardElement().
paymentFlow() builds the button label from the formatted session amount when it is available, for example Pay £19.99. verifyFlow() renders Verify Card.
Set identifier explicitly if you mount more than one Flow instance on the same page.
Events
Flows expose the same event model as Elements for readiness, processing, authorisation, and error handling.
paymentFlow.on("cpe:ready", () => {
  // flow iframe is ready
});

paymentFlow.on("cpe:authorise:start", () => {
  // backend authorisation has started
});

paymentFlow.on("cpe:authorise:end", (e) => {
  // backend authorisation has finished
});

paymentFlow.on("cpe:error", (e) => {
  // show a user-friendly error message
});
When to Use Flows
- Use Flows when you want a faster integration with a built-in payment call-to-action and result states.
- Use the lower-level card form flow when you need full control over the checkout UI and step-by-step orchestration.
If your Elements integration needs to store a card, update a card holder account, or prepare a card for subscription payments, use the Elements Card Storage guide.
That guide covers how to create the Payment Intent with account_id, cardHolderAccount, and recurringIntent, and how the same setup works with CardElement and Flows.
These patterns apply to cardElement() integrations.
Direct Mode
const citypay = await CityPayPromise();
const elements = await citypay.elements({
  pubKey,
  createServerIntent,
});
const card = elements.cardElement({ identifier: "default", ...options });

await card.init();
await card.awaitReady();

card.onChange((state) => {
  setCanSubmit(state.complete);
});

// In your submit handler, once the form is complete:
const tokenResponse = await card.tokenise();
const token = tokenResponse.data.cp_card_token;
const intentId = await elements.getPaymentIntentId();

await card.attach({ intentId, token });
const confirm = await card.confirm({});

if (confirm.status === "requires_authorisation") {
  const resp = await fetch("/api/payments/authorise", {
    method: "POST",
    headers: { "Content-Type": "application/json" },
    body: JSON.stringify({ intentId }),
  });

  const auth = await resp.json();
  // handle auth response
}
Proxy Mode
const citypay = await CityPayPromise();
const elements = await citypay.elements({
  pubKey,
  createServerIntent,
  middleware: {
    attach: "/api/payments/attach",
    confirm: "/api/payments/confirm",
    authorise: "/api/payments/authorise",
    verifyAuth: "/api/payments/verify-auth",
  },
});
const card = elements.cardElement({ identifier: "default", ...options });

await card.init();
await card.awaitReady();

card.onChange((state) => {
  setCanSubmit(state.complete);
});

// In your submit handler, once the form is complete:
const tokenResponse = await card.tokenise();
const token = tokenResponse.data.cp_card_token;
const intentId = await elements.getPaymentIntentId();

await card.attach({ intentId, token }); // hits /api/payments/attach
const confirm = await card.confirm({}); // hits /api/payments/confirm

if (confirm.status === "requires_authorisation") {
  const resp = await fetch("/api/payments/authorise", {
    method: "POST",
    headers: { "Content-Type": "application/json" },
    body: JSON.stringify({ intentId }),
  });

  const auth = await resp.json();
  // handle auth response
}
awaitReady() ensures the iframe handshake has completed, but integrators should typically use onChange to know when the form is complete and only call tokenise() once the customer submits the form.